
Almost every Wordpress user is familiar with plugins and their benefits as a whole. They simplify complex tasks and enhance the functionality of your weblog without modifying the core. Even though there are thousands of plugins available on web, still sometimes we couldn't find the one that yields the same result, as we want. Why not create our very own plugin? Well, if you can tweak your theme (basic HTML editing, simple CSS enhancements), you can make your own plugin in no time. Let's see how to create a basic Wordpress plugin that serves as a platform for a more complex one.
Note: This tutorial assumes that you're familiar with Wordpress and have basic knowledge of HTML and PHP.
Our plugin will not do anything exceptional, since it's just a sample plugin to get you started. This elementary plugin will do two simple tasks. First, it will display a friendly text message on top of Wordpress administrator dashboard, and secondly, it will display a line of text at the end of each blog post. So let's get started.
We'll start by creating a new text file my-first-plugin.php. Add the following text to the file. It's a standard plugin information header that helps Wordpress in identifying the plugin.
Although each line in the header is self-explanatory, still it's better to once go through each entry.
 You can activate and deactivate your plugin at this moment. Since we have not placed any real working code in it, plugin activation will have no effect except a notification of successful activation. So let's move on to the next step and include a code to display a message on top of the admin dashboard. Here's the code...
Make sure you put this code just above '?>'. Now lets dissect what this code does. First, we've created a function display_admin_notice(), that simply displays a text message. The second part does all the magic. add_action() function is a Wordpress function that hooks on to a specific action specified by the user. Actions are referred to as events that are initiated by Wordpress core engine whenever something happens, like a page refresh in admin panel, change of theme etc. Here we've hooked on to 'admin_notices' action (triggered whenever admin dashboard page is refreshed) and have passed on our custom function to display the text message every time this event happens.
Once you've added the code, simply activate the plugin, and instantly you'll see the notice on top of admin dashboard as shown in the image above. Yay! We've just created our first working plugin.
Now lets move on to the second part, where we'll try to display a line of text at the end of each post. Again we'll take help of a custom function to append a line of text to the post content. Here's the code...
We've created a custom function display_post_end_notice() that receives post content as an argument. After appending a line of text, our custom function simply returns the modified post content. The second part consists of a Wordpress function add_filter(). Filter is simply a hook that Wordpress triggers before sending the modified text to database or to the browsers screen. Here we've used the 'the_content' tag that returns the post content and is passed on to our custom function display_post_end_notice() as an argument. After modification add_filter() sends the modified post content (containing our appended line of text) to the browsers screen.
And here's what it looks like. The first line is the original post text and the second line is injected by our plugin. Oh, I forgot to tell you about is_single() function used in our custom function. This function simply checks whether a visitor is browsing a single post page or not. If he's not on a single post page, nothing will be added to the post content.
So that's it. You can download this plugin file for instant testing on your local Wordpress install.
Note: This tutorial assumes that you're familiar with Wordpress and have basic knowledge of HTML and PHP.
Our plugin will not do anything exceptional, since it's just a sample plugin to get you started. This elementary plugin will do two simple tasks. First, it will display a friendly text message on top of Wordpress administrator dashboard, and secondly, it will display a line of text at the end of each blog post. So let's get started.
We'll start by creating a new text file my-first-plugin.php. Add the following text to the file. It's a standard plugin information header that helps Wordpress in identifying the plugin.
<?php
/*
Plugin Name: Test Plugin
Version: 1.0
Description: Just a test plugin!
Author: Rajeev Edmonds
Author URI: http://URI_of_plugin_author_website
Plugin URI: http://URI_of_plugin_descripion_and_updates
License: A slug describing license associated with the plugin (usually GPL2)
*/
?>
/*
Plugin Name: Test Plugin
Version: 1.0
Description: Just a test plugin!
Author: Rajeev Edmonds
Author URI: http://URI_of_plugin_author_website
Plugin URI: http://URI_of_plugin_descripion_and_updates
License: A slug describing license associated with the plugin (usually GPL2)
*/
?>
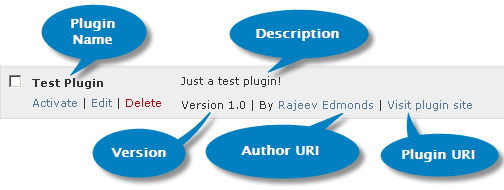
Although each line in the header is self-explanatory, still it's better to once go through each entry.
- Plugin Name - While naming your plugin, once check that you're not giving a conflicting name to your plugin. Since the sheer volume of Wordpress plugins is so high, there are good chances that you may end up putting a name that matches with an existing plugin.
- Version - You can choose any version system you want. If it's going to be a complex plugin with frequent updates, it's better to go with a 3-digit version system (eg. 1.0.0), else, a simple 2-digit version system (eg. 1.0) will do the work.
- Description - This is one of the important fields. Make sure, you're writing an unambiguous and clear text explaining the exact functioning of the plugin in layman's language.
- Author - Do I need to explain this?
- Author URI - Mention your weblog's or website's url here. It can be a homepage, portfolio or contact page.
- Plugin URI - It's common for plugin authors to create a dedicated page for plugin mentioning about it's features and updates. Specify that plugin url in this field.
- License - This field indicates the license associated with your plugin. Since you're going to build it for Wordpress platform, it's generally a good idea to go for GPL2 or compatible license. If you are building a complex plugin with proprietary images and javascript, you can opt for split GPL license.
function display_admin_notice() {
echo '<p>Just a notice for demo purpose!</p>';
}
add_action('admin_notices', 'display_admin_notice');
echo '<p>Just a notice for demo purpose!</p>';
}
add_action('admin_notices', 'display_admin_notice');
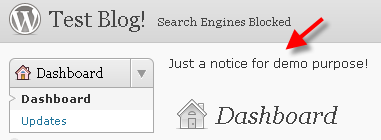
Make sure you put this code just above '?>'. Now lets dissect what this code does. First, we've created a function display_admin_notice(), that simply displays a text message. The second part does all the magic. add_action() function is a Wordpress function that hooks on to a specific action specified by the user. Actions are referred to as events that are initiated by Wordpress core engine whenever something happens, like a page refresh in admin panel, change of theme etc. Here we've hooked on to 'admin_notices' action (triggered whenever admin dashboard page is refreshed) and have passed on our custom function to display the text message every time this event happens.
Once you've added the code, simply activate the plugin, and instantly you'll see the notice on top of admin dashboard as shown in the image above. Yay! We've just created our first working plugin.
Now lets move on to the second part, where we'll try to display a line of text at the end of each post. Again we'll take help of a custom function to append a line of text to the post content. Here's the code...
function display_post_end_notice($content) {
if (is_single()) {
$content .= 'It\'s just demo text at the end of every post.';
}
return $content;
}
add_filter('the_content', 'display_post_end_notice');
if (is_single()) {
$content .= 'It\'s just demo text at the end of every post.';
}
return $content;
}
add_filter('the_content', 'display_post_end_notice');
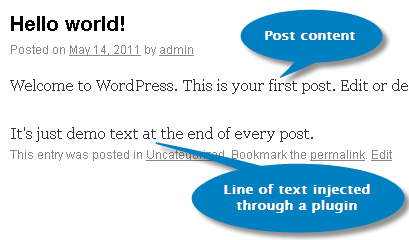
We've created a custom function display_post_end_notice() that receives post content as an argument. After appending a line of text, our custom function simply returns the modified post content. The second part consists of a Wordpress function add_filter(). Filter is simply a hook that Wordpress triggers before sending the modified text to database or to the browsers screen. Here we've used the 'the_content' tag that returns the post content and is passed on to our custom function display_post_end_notice() as an argument. After modification add_filter() sends the modified post content (containing our appended line of text) to the browsers screen.
And here's what it looks like. The first line is the original post text and the second line is injected by our plugin. Oh, I forgot to tell you about is_single() function used in our custom function. This function simply checks whether a visitor is browsing a single post page or not. If he's not on a single post page, nothing will be added to the post content.
So that's it. You can download this plugin file for instant testing on your local Wordpress install.


0 comments:
Post a Comment